Showing posts with label tutorial. Show all posts

Friday, 24 March 2017

Felt ball push pins - tute

Hello my lovelies, another week is flying by, I cant believe its Friday again! I seriously have no idea where the days go. Maybe its because I have so many projects on my To Do list, its keeping me so busy I don't notice the days passing by. 

After such a long time of being out of 'mojo' for blogging I'm finding 
it much easier these days. I'm not sure if its because I'm making stuff again or what but I'm not going to question it, it feels right and that's good enough for me. 

 So this weeks post is to show you how I made the felt ball push pins for my new pin board. I found this gorgeous pin board on ebay, it comes in different colours but I bought it in white with the idea that I would paint it myself. 


I bought a selection of felt balls from Blooming Felt, the chrome push pins also came from ebay and my little mini glue gun came from Hobbycraft which I bought last year. I have to admit, I've had so much fun with that little glue gun :)


I would suggest buying some decent quality push/drawing pins, you want them nice and sturdy for pushing into your cork board. I bought chrome coloured ones as I wanted them to look nice and shiny.


I chose a selection of 1.5cm balls which match the colours of my 'Follow your dreams' cushion that you can see in this post.


I did make a little video of how to make them but it didn't turn out too well and I couldn't figure out how to rotate it so that you could actually watch it the right way up.....if you have any tips or tricks please do let me know.

OK, its pretty simple so I'll just bullet point the process:

You will need:
Hot glue gun, glue sticks
felt balls (1.5cm)
Metal push/drawing pins

Instructions:
1. Heat up your glue gun
2. Take a push/drawing pin, hold it by the pin so that the head is facing you
3. Apply a pea sized amount of glue to the head of the pin
4. Take a felt ball and press it onto the head of the glued pin, hold it for a few seconds to make sure that the glue starts to dry
5. Leave them to one side to dry thoroughly
6. Snip off any excess glue with a pair of scissors


And there you go you should end up with felt ball push pins just like these :)

How can these not make you smile!!!!! 


They look fab on my pin board.


I love the fact they look like they are floating on the board. Each pin cost about 19p to make which I think is a bargain!!!
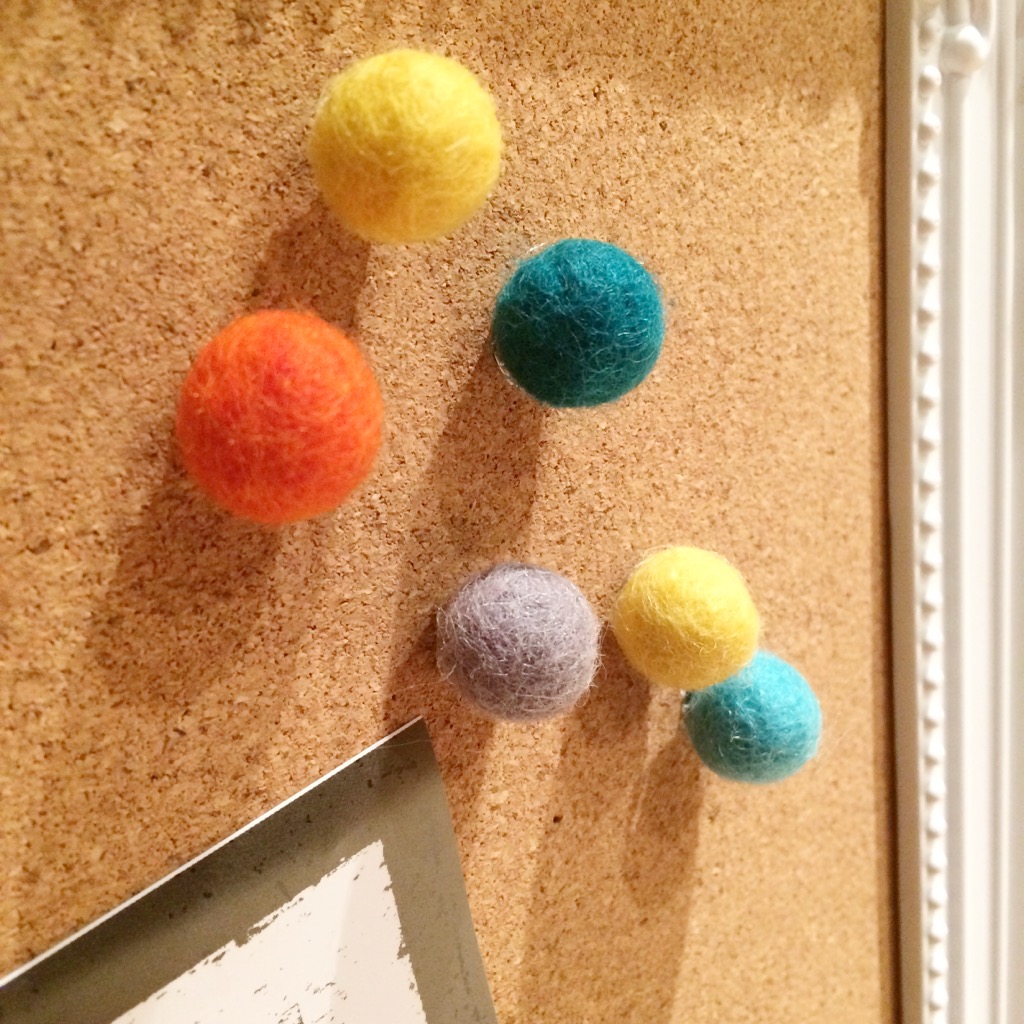

Thanks for stopping by and reading, I'd love to hear if you try it out, you could use different shapes, heart or pebble or even buttons, cabochons or anything else you find......what about Lego pieces???

Have fun,
Emma xxx

Thursday, 30 January 2014

Love Patchwork & Quilting - magazine feature


Sorry its took me so long to show you my tute that was featured in Love Patchwork & Quilting, things have been busy, busy, busy.


I loved the photos that they took of the finished boxes, I wish I could take these sort of photos of my products. Out of all the magazines that I've worked for this one has to be my favourite. The editor Jen was so lovely and so were all the staff from all the departments. Even though I was on a tight deadline, I never felt rushed or pressured. 


Can you see me???? I have to say that although I am by no means a quilter, I really enjoyed the piece work for the tops of the boxes it gave them an added dimension and just that little bit more interesting.

The fabric I made the boxes from was supplied by the Eternal Maker and the fabric is Melody Miller.


Now to think of a new patch work project so that I can write another tute for them :D

Tuesday, 4 June 2013

Box corner tutorial

Here's a little tutorial for you on how to make box corners. These can be used for all sorts of projects, I mainly use them for my bags and fabric storage boxes. They're really easy to do.....I've used a basic rectangle shape so you can see how simple and effective they are.


Take your project, which for this example I have sewn 2 flat pieces of fabric together and sewn a 1cm hem on 3 sides leave the top seam open...


Slot your hand in the open seam between the two layers....


Flatten both one of the side seams and the bottom seam, pinching them flat creating a point with the corner of your project....


Your corner will look like this....


Check to make sure that your bottom and side seam match and flow along the bottom and up the side as evenly as you can.....


Measure from the point down to a suitable place and make a mark with a pencil....
**tip: the further away your mark is from the point the deeper your box corner will be**


Using a ruler (or graders square) draw a horizontal line across your seam where you made your pencil mark, this will be your sewing line....


Run one line of stitching along your pencil mark......


I always like to go back and sew an extra line of stitching just over the seam, this will prevent your seam opening up once you have trimmed off the excess....


Now trim your corner approx 1cm away from the sewing line, this makes the corner sit better once turned through the correct way.....


Your box corner will now look like this :D


Now repeat this process again on the other corner....


Your box corners should now look like these....


Press open your seams....


Your box corners will now look like this...


Standing up all on its own thanks to the box corners....


Now you can turn your project in the right way....


And admire your handy work :D


Ta dahhhhh!!!

There you go, box corners that you can apply to any project you like! Go create!!

Saturday, 30 March 2013

Easter Bunnies Egg Cosy Tutorial


I thought it was time to post this tutorial in full again since its Easter weekend. I know some of you will have already seen this but I made some this week and instead of felt tummies and ears I used some funky fabric. I'll post photos of them soon, meanwhile enjoy this simple and fun tutorial :) 

Hoppy Easter everyone!!


Materials you will need:
Lovely soft squares of felt of your choice
Embroidery threads
Your templates
Scissors
Brads (for eyes)


Additional Materials:
Buttons, Ribbon, and anything else you like
Trick Marker


Take your templates and using your Trick Marker, draw out your pieces.
You will need:
X2 Main body pieces
X1 Front head
X1 Back head
X1 Chest piece
X1 Puffy Tail
X2 Ear pieces
Small nose piece (you don’t need a template for this just cut out a small oval shape)


Now you have all your pieces, take the chest piece and place on one of the body pieces so that it sits at the bottom, like below. Pin in place.


Using a running stitch take contrasting coloured embroidery thread and sew the chest piece to the body.


Now take your front head piece and place the earpieces like below and pin in place. Again using a running stitch sew onto the head piece.


Which should look like this....


Now take your puffy tail, pin to the other body piece (which will be the back of your bunny) and sew in place.


Once you have all your pieces, you need to place the front and back of the head on top of the body pieces so that they overlap slightly....


And pin in place.


Next take your front of your bunny and carefully sew the nose just on the very bottom of the head. Be gentle with it small pieces of felt can be quite fragile (bless).


Now, if you know how to blanket stitch then great, if you don’t here is a brief explanation, I learnt by watching videos on YouTube, search for ‘how to blanket stitch’.
You are going to blanket stitch the bottom edge of the front and back pieces of your bunny.

a) knot the end of your thread and from the back insert your needle about 0.5cm from the edge and bottom and pull through, reinsert your needle close to where you have just been and pull through to the back making a loop.


  • b) Now thread your needle through the loop.

    c) And pull tight (not too tight though or you will squash your felt).

    d) Reinsert your needle from the back about 0.5cm along from your first stitch

    e) Slot your needle through the loop and pull tight.

    f) Carry on all the way along the bottom until you get to 0.5cm away from the end and tie your thread off.


    This is what your finished stitching should look like, don’t worry mine was awful the first few attempts but once you get the hang of it it’s easy.

    Now using your Trick Marker again, mark two dots where you want the eyes to be.


    Take your brads and push through the felt until they are flat, turn your bunny over....


    ....and separate the brad until it lies completely flat on the reverse side. Repeat with the second brad.


    Now take both of your bunny pieces, right sides facing out and pin together.


    This will make it easier keeping it in place while you sew right round the edge of your bunny.


    Again use the trusty old running stitch and sew from the bottom corner of your bunny right round the ears to the other corner, ensuring you don’t sew up the bottom.


    Now if you find this bit a little tricky then sew the head pieces in place after you have sewn the nose on when the pieces are separate.


    And there you go, one Easter bunny egg cosy!!


    You can add all sorts of embellishments to make your bunnies look jazzy, I had great fun playing around with them.


    TEMPLATE