Saturday, 26 August 2017

Sew over it pencil skirt - by accident!!!

So its Friday night, I am half way through cooking a shepherds pie, I have a glass of wine and The Gypsy Kings are serenading me through the stereo :D Oh shit yeah and I forgot I've left the washing out.....back in a second!!!!!

Right where was I.....Oh yeah this is how I roll on a Friday.

This week has been a busy one, how on earth did I fit in a full time job before???? Lol....well however I did it I will have to master that skill again soon (hopefully). I have two interviews next week, wish me luck!! 

I have realised as well if you follow me over on Instagram that I am significantly behind on blogging....so you will have already seen some of these photos. I fully intend on catching up....at some point ;)

Now I know I said that I promised that I would be posting a make from a pattern other than a Sew Over It one, but, in my defence I did think I was going to make it from a Simplicity pattern, but........

When I went to open the pattern to cut my size out, I thought, hmmmmm where is the size 10???? Then the brain kicked into gear and I realised that I had bought the US 14-22 which I think is UK 18-26. Picture eyes rolling back into head., really!! Yes, that will teach me for speed buying when the patterns were on sale!!! And obviously because I was waaaaaaay too impatient, I was straight on the internet looking for a pdf pattern that I could download straight away. Well I have never been one for waiting for anything, my Mother will tell you that!! So within the hour, I had downloaded, printed and cut out the SOI Ultimate pencil skirt. This was purely because it was a similar shape to the Simplicity one, which meant I could use the zip I had bought.


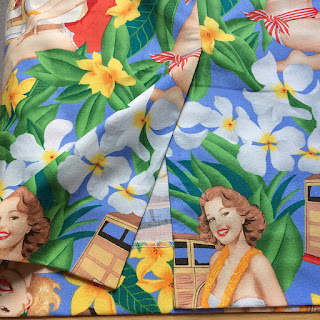
This was the gorgeous fabric that I had in mind for the skirt....you may recognise it from my bag making days, as I also have it in a sage green colour which I made a clutch bag out of but sadly not enough to make the skirt, so out came the blue.


The pattern again was really simple, front and back pieces with front and back facing pieces. No lining on this one....WINNER!!!! At some point I will attempt a skirt with lining but just not yet :D


It calls for an invisible zip....which to be honest I wasn't that worried about, even though its been about fifteen years since I last sewed one lol I have to add here that I did not follow the instructions for inserting the zip as I followed MimiG's tutorial on how to insert an invisible zip. You know I love MimiG and her tute is so simple and her method I think is the best!! Just look at that zip!!!!

Also I am going to admit that the zip I had bought for the other pattern was an 8" one but this pattern requires a 12" zip, I thought I would try it anyway to see if I could get away with it. Its OK but because of the high waist and where it sits you would need the 12" zip....I have to do a little wiggle dance to get into it.


This pencil skirt is quite high waisted, probably a little too high for my taste to be honest, but as this was my first attempt I went with it. It does look very classy but I think next time I will amend the pattern so its not as high. 


The skirt also has a vent at the back centre seam which I love!!!!! This part was so easy to sew, the instructions are really clear as to what to do.....loving a vent!!!!! I really enjoyed making this skirt and I have to say hats off to Lisa at Sew Over It for making yet another fantastic pattern. I love the skirt, its a snug fit, but not so that its not comfortable. 


And here it is......

What do you think?


At first I thought this fabric/print would be too much for a pencil skirt, but I gotta say it......I love it so much, I've tried it with this white vest and a black one and its definitely a winner in my book!!!


Queue my really bad poses at the top of our stairs lol its the best light in the house for taking photos and considering these were took with my iphone attached to a tripod with a hair bobble I dont think they are that bad :D

So I have to say that this skirt was a fantastic accident (due to the Simplicity pattern fiasco with the sizes) and I can see this one being replicated many times. You gotta love a pencil skirt. Would love to make a black one for work and maybe a tweed one for a bit more of a classic look.

Have a fantastic weekend my lovelies and I will be back soon with some more of my sewing adventures...

Emma xxx

Friday, 18 August 2017

Sew over it - Ultimate Shift Dress

Hello my lovelies and happy Friday to you all!! 

Well what a week it has been, I did plan on writing this post on Wednesday but time just seems to have slipped by me. I've just taken a break from cutting out some fabric, made a cup of coffee and plonked my bum down in my chair in the corner of my sewing room. Now, this is becoming a rarity as Summer, my youngest furbaby, has now decided that this chair belongs to her! Cheeky monkey! 
If there are times when I cant find her any where in the house its because she has sneaked up here and snuggled herself into the throw on it. There has even been times when I've been sat in it and she has walked into the room with a look as if to say "Errrrm scooze me Mama you is sitting in meez chair!!" and of course I move and go and sit at my desk (I know what you're thinking, idiot, but how could I refuse that face?).


So in amongst the job hunting (here has been a lot of that this past week, as my time of semi retirement has almost come to an end sadly) I have made another item for my wardrobe.
This time its the Sew over it - Ultimate shift dress. I can hear you all moaning from here, uurrrggghhh why doesn't make something from a different pattern company? Its coming soon I promise, its by accident I keep making from their patterns, another way you could look at it is that they must make very good patterns. They are easy to follow, good for beginners (I think), and the fit is true to size (for me anyway).

Right lets get to it!
So this fabric, I purchased from an ebay shop, I think its called Regencyragsfabricstore or something similar. As I said before I bought a load of fabric from them, mainly because it was cheap and great for practising dressmaking. So if I did make any mistakes it didn't matter so much.


The pattern consists of one front piece, two back pieces, two facing pieces (depending which version you make) and two sleeve pieces. Now you have got the option of making, a sleeveless, short, 3/4 or full sleeve. I'm a huge fan of a short sleeve, this is due to my obsession with cardigans and the fact I love to throw one over a dress. Again another first in a long time for me with this pattern was setting a sleeve in. Now, it wasn't perfect there was a little puckering at the back seam, but all in all it was quite good and I'm fine with it :) Next time I will nail it!! 


It was another hook and eye fastening at the back, I love this, partly because I love sewing this type of opening but also because I think it looks really nice.


I found sewing the dress together pretty easy, the only part I was a little nervous about was the sleeves but I needn't have been as it wasn't half as scary as I had been picturing it in my mind (from previous experience years ago).


And of course, one of my labels. At this rate I will have to get some more made!! That's a good thing though, right? I cant tell you how much I am loving making my own clothes. I have to give a little shout out to the people who taught me to make clothes in the first place, now I know that they will never get to see this but its nice to give them the credit they deserve. When I was at Newcastle College studying Fashion Design we had two technicians called Joan and Christine and they were AMAZING!!!!!! Thank you for teaching me the skills I have today!!!


And here it is the finished dress, for the next one that I make I have adjusted the pattern ever so slightly. I have added 1cm to the front and back pattern pieces at the centre seam and I've added 2 inches to the length. The length on this one is OK but I wanted this dress for work wear and I think its a little short.  I think could get away with it with thick tights and boots for the winter of course. That is very me :D


Saying that though I do love it, its definitely my style, it should be worn without a belt as its a shift dress but anyone who knows me knows I cant live without accessories, so out came the belt. I was also a little unsure of the fabric when I first bought it but I think it works well with this dress pattern. 


My verdict then: big thumbs up for Sew over it, this pattern is easy to make/follow and looks great on. I would definitely recommend this pattern to anyone wanting to try a simple dress. As always looking forward to making another soon!!!!

Have a fabulous weekend.....
Emma xxx

Friday, 11 August 2017

A little more hams and sausages?

Whhooooooo I really am on a roll this week with blog posts hey? I have just parked my behind down on our very comfortable sofa (I do love our sofa, its one of those ones where when you sit on it you never want to get up again lol!!), with a very large cup of coffee and I'm trying to tie up all the loose ends so that Mr.B and I can spend the whole weekend relaxing together.

So while I was also on a roll of fun making, I decided to sew together some of the Tailors Ham and Sausage pressing sets that I made myself a few weeks ago. This kinda happened by accident, well I say this, I'm blaming it on you, the lovely people who asked would I be making any more....well here they are :D


I've made two sets and although I do enjoy making them, I don't think I will be making anymore, due to being focused on other things. So if you want to get your hands on a set be quick!! 

Obviously I had to make a sewing themed set!! And I have to admit I am a little bit in love with these ones!! One side there are vintage sewing items and on the other a gorgeous yellow letter set print.


The measurements are : 

HAM : 24cm x 18cm x 10cm
SAUSAGE : 29cm x 8cm x 6.5cm


They are made from cotton and are filled with sawdust....the good old fashioned way!!!


This is the second set, a gorgeous lime and teal floral pattern with a teal abstract floral print on the otherside.


I think they would make a fantastic gift for a sewing enthusiast or if you just really love ironing and want some fun and colour in your life, you totally need these!!!!


The sets are £20 plus £3.40 postage.

They are listed on my website, facebook and instagram but if you're interested just leave me a comment below :D

Have a great weekend my lovelies, I will be back on Monday with the next instalment of my dressmaking adventures!!!! 
.......
Emma xxx

Tuesday, 8 August 2017

Balls, balls, balls

Felt ones that is........


Time for a little time out post from all the dressmaking I think. Can you believe it will be 10 weeks tomorrow since I left my job?!! I can in one hand as it feels like a lifetime ago and then I cant in another as I would like to have another 10 weeks off :D that cant happen though I have to get back to a day job soon. I've applied for a number of jobs and think I finally pin pointed the type of job that I want to do....I just have to get it now!! (think positive!)


Any way in amongst all the dressmaking (self discovery), the job applications and everything else I seem to be filling my time with I've been indulging in a little bit of fun making. After the pencil cases I wanted to make some more of the felt coasters that I'd made for my sewing room. I just think that they are so bright and cheerful, really sturdy and can be made in any colours you want!!! 


A simple way to add a little bit of colour to your room!!! 


This one is my fav but of course that's because I have one in the same colours in my sewing room :D

Not blowing my own trumpet but I also though that the felt ball push pins that I made for my notice board looked fantastic so I made a load of those too. They are all on my website available to buy, tough part now is just choosing which ones are your favourite!!!

Right I'm off to grab a cuppa and a chocolate biscuit!!!
...Oh yes and cut out some fabric to make a skirt....post coming soon.

Emma xxx

Friday, 4 August 2017

Sew Over It - Poppy Play Suit

Happy Fri-yay my lovelies, I hope you have all had a good week and are looking forward to the weekend, I know I am. Hopefully the weather will be nice enough to spend sometime in the garden.


So I'm back today to show you the next item on my 'Make 9' list, which is the Sew Over It - Poppy Play suit. This pattern was a free with issue 16 of Simply Sewing Magazine and as soon as I opened my subscription I knew I wanted to make this one. Its right up my street. Again the fabric that I used for this make was another bargain from ebay, it was only about £2-£3 a meter. And as I am practising and getting back into dressmaking I thought it was a good budget fabric for having a go at this one.

I did think that maybe I was making things difficult for my self by choosing a textured crepe and I have to admit it was a little slippery to work with. But because of the lovely drape of the fabric and the pattern, you dont need to be too precious with it.


I know I say this a lot but I love to overlock!!! If it were a hobby it certainly would be mine :D 

I managed to get the bodice sewn together relatively quickly, its an easier pattern than it looks, there is a front bodice piece and two back pieces, the sleeves are part of the bodice so no sleeve setting for this one. Then you have two front pieces and two back pieces for the shorts and of course a neckline facing.


Once it started coming together I realised how much I loved the fabric that I had chosen and persevering with its slipperiness was so worth it!


I was really surprised at how quickly it came together, the pattern instructions were really easy to understand and very straightforward to follow. The only part I would say I didn't like was slip stitching the turn ups on the sleeves and hem of the shorts. And because of the drape of the fabric I chose I ended up slip stitching the top of the turn ups too as they were flopping down a little. In the end it was worth it, maybe next time I will use something with a little less drape so that it stays in shape once you press it.


So this is the finished garment and I absolutely love it, the fit is perfect and I love the style. It looks great dressed up with heels and a jacket but also looks great with sandals or pumps to go for a more casual look. What do you think?

My aim is to be able to make myself a staple wardrobe of classic items that wont go out of fashion, so once I have figured out which patterns are going to feature in my capsule collection then I can get cracking on some more makes, I'm thinking a midnight blue crepe for this pattern I think it would look gorgeous!!

Next on the list is the Sew Over it - Ultimate shift dress.....sorry I know all of my makes so far are SOI ones but I promise there are some other patterns coming soon :D

Have a fabulous weekend my lovelies, see you next week...
Emma xxx